This is what you call the P.S. to the parts 1 and 2 I posted before.

I just realized I left out my most favorite graphics tip of all. 

6. Draw 'em yourself in PowerPoint using shapes, lines, colors, etc and dress them up by taking pieces from clipart. You can use the standard circles, boxes, etc to create your own images and then take pieces off of clipart drawings for decoration. Think Mr. Potato Head. I have learned a ton about using clip art for your own evil purposes from the amazing genius at The Rapid E-Learning Blog. I read all of his blog posts - they are always fascinating.
Picture
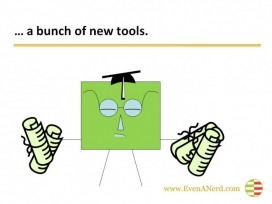
From a presentation called 'Top 10 Reasons People Hate Their Accounting Software' illustrating how much they hate learning stuff.
My slides used my little block person who was dressed up thanks to features from clipart. See the graduation cap on his head? Took that from another image. For me this was a ball to create and the nerdy guy fits perfectly with my nerdy self.
 
Pro: This is fun to do and everything is original.
Con: There are only so many ways to use a blockhead, but you'd be surprised what you can do with a little imagination.

Okay, there. I think this is really the end of the post this time.
 
 
...Continued from a prior post - see options 1 and 2 below.

3. Hire a professional to create custom graphics for you- there are tons of talented professionals who would be happy to help you out. I have used sources from www.crowdspring.com and www.elance.com both are excellent places to find talent, but Crowdspring lets you try before you buy. You give them a budget and a project description and artists will submit entries hoping you will choose their design and award the funds to them.

I
decided I needed more professional pictures so I hired someone to create illustrations for my slides.

This is one concept: "The banker is watching you more closely than ever."
Picture
Original illustration by Gemma Barrett, done through CrowdSPRING.

Pro:
You get some gorgeous images
Con: You have to keep your presentation consistent. So if you need to add something at the last minute or change a concept, you need to hire the designer again to keep the same look. And once I had these, I realized that the fact that they are so professional actually doesn't fit with my persona. One of the things that has bugged me about Microsoft's presentations over the years are that they are so obviously professionally done and corporate, they don't reflect anything about the presenter. I love these drawings and the creative person who did them for me, but this approach didn't work for me.
4. Take your own photographs- how hard can it be - right? Well take it from me, it's harder than you think to get an image that doesn't look like your 4 year old niece from Alabama created all your pictures.

I tried this approach for a presentation called "17.5 ways even a nerd can be heard".  Here's one of the slides.
Picture
#1 Know Yourself - photo of a mirror by Geni Whitehouse
Pro: No one else has a picture like this in their slides.
Con: No one else would want a picture like this in their slides. Can you tell this is a mirror?  I don't think so.
5. Draw your own pictures- live-on a flipchart- without PowerPoint!

This is my new favorite way to present. So here's how it happened. I presented a topic to the CALCPA Napa group last week and they don't have a facility for sllides. So I bought a table top flipchart and took it and pens with me. I created my complete presentation in PowerPoint and printed the handouts from there so people could look at them later and see what I had been trying to draw. But then I went through the whole presentation by drawing each of my 10 points.

Did I mention I can't draw at all? That made it even better.
Picture
Photo of drawing on a flipchart to illustrate point #3 : Never Use Words When A Picture Will Do'. Note picture frame.
Pro: Portable, easy, interactive, gets your audience involved as they try to figure out what this could possibly be.

Con: You might end up with marker on your hands, it's a little hard to see if you have a really large crowd, but otherwise it works.
And did you know these little table top flip charts with 20 sheets run $30? Mine was 3M's Post-It brand.
 
 
I am a big proponent of making your entire presentation visual. The problem for me is that I can't draw, I take bad photographs, and none of my talented relatives will cooperate enough to provide me with images to use. (I have lots of artists in my family, they just don't want to do graphics for my slides for some reason...)

So what's a nerdy numbers person to do?

Here are some ways you can create your own visual aids for your next presentation:

1. Purchase images from a website – there are a number of websites that offer professional photographs royalty free. My favorite is www.istockphoto.com . They offer  a ton of gorgeous images at a very affordable price, and they make it easy for you to try them out and download the image once you have found the right one
Picture
IT guy from my 'Doing More With Less' presentation. Image purchased from www.Istockphoto.com
Pro: Professional images
Con: Other people might end up using the same images in their presentation.

2. Use clip art – the clipart library gets deeper every day. Now that you can access images online, there seems to be no end to cutesy graphics that you can insert into your slide show.
Picture
Picture of an accountant from Microsoft online clipart files
Pro: Quick, easy, and cheap
Con: Quick, easy, and cheap.That means everyone in your audience will know you are using the same clipart they use for their presentations. This does not set you apart as a professional.

To be continued...
 

www.evenanerd.com